1. Create the workspace and sign in
GlacierPoint Atlas writes the dated, as-built document of a Microsoft 365 tenant. Two parts do the work. The Windows app runs on a computer of yours, signs in to Microsoft as you, reads the tenant and uploads one sealed run. The portal, in your browser, holds your workspace, writes the document from the run and gives it to you as a page, a PDF and a Word file. Nothing in your tenant is ever changed by a run; the only thing the product writes in a directory is the registration of scheduled runs, and only after you confirm it (section 8).
A workspace holds your team, your tenants and every document. Start free creates a Preview workspace: free, no card, two runs of one tenant.
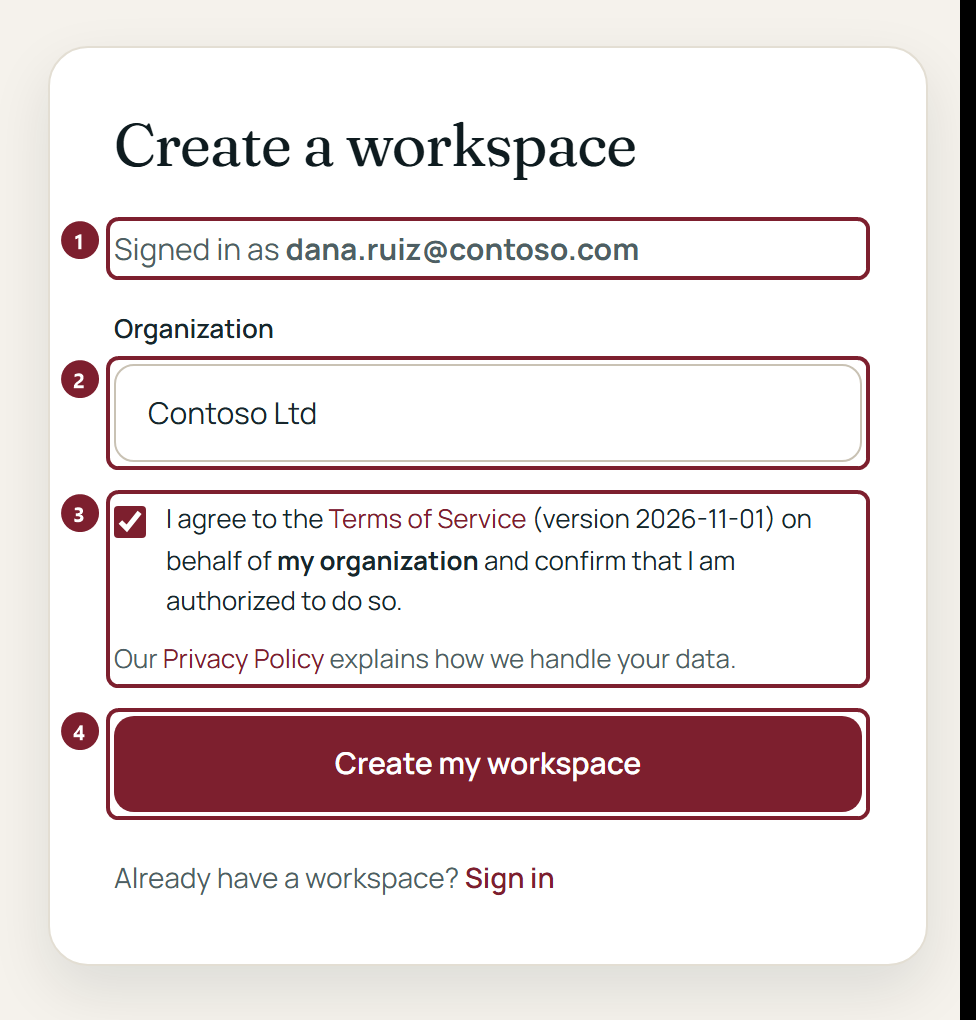
- 1You sign in with your GlacierPoint account: Continue with GlacierPoint opens the sign-in of GlacierPoint Accounts, which emails you a code once and confirms the address. The same sign-in serves every GlacierPoint product, and there is no password to keep. You come back to this page with the address shown here.
- 2The name of your organization. It names the workspace and is printed on the documents as the preparer.
- 3The Terms of Service, when a version is in force: you accept them for your organization, with the version shown. The Privacy Policy is linked below it.
- 4Create my workspace creates the Preview workspace and signs you in as its owner.
Next time, choose Sign in at the top of any page and use the same GlacierPoint account. The first person to sign in is the owner; owners invite colleagues in Settings (section 10).
The portal says "Contoso Ltd", "Dana Ruiz" and similar names in the pictures of this guide: they are the fictional sample tenant that the app and the portal show in their demonstration.
2. Connect the app
The app is downloaded from the portal and connected to your workspace once per computer, the first time you run. The portal's menu entry Connect an app and the button of the same name at the top of the Tenants page open the page where you approve a connection.
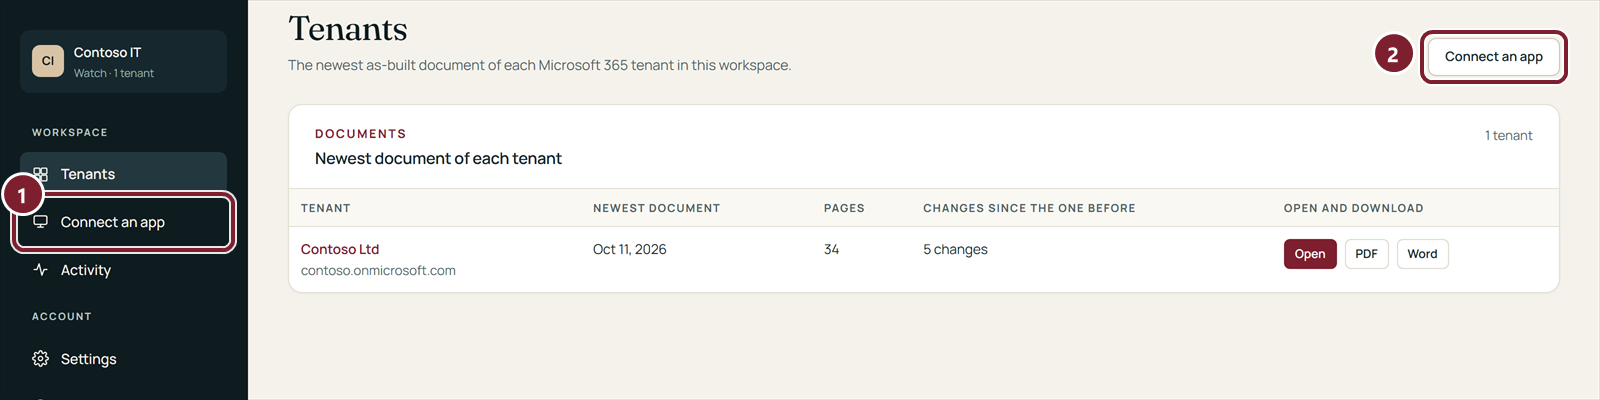
- 1Connect an app in the menu.
- 2The same page from the head of the Tenants page.
The Terms of Service
When the portal has a version of the Terms of Service in force, the app shows it before its first connection to that portal, and again when a new version comes into force.
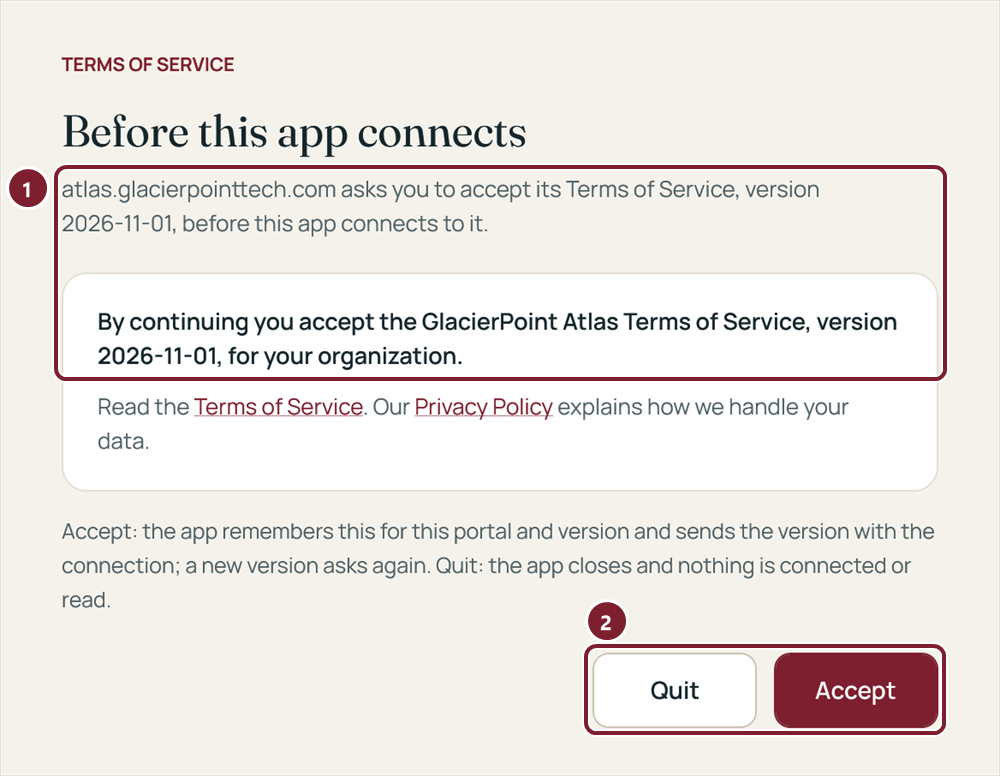
- 1What you accept, for your organization, and the version. The links open the Terms of Service and the Privacy Policy on the website.
- 2Accept remembers the version for this portal. Quit closes the app; nothing is connected or read.
The pairing code
When you press Run on a computer that is not connected yet, the app asks the portal for an eight-character code, shows it, and opens the portal's Connect an app page in your browser with the code filled in.
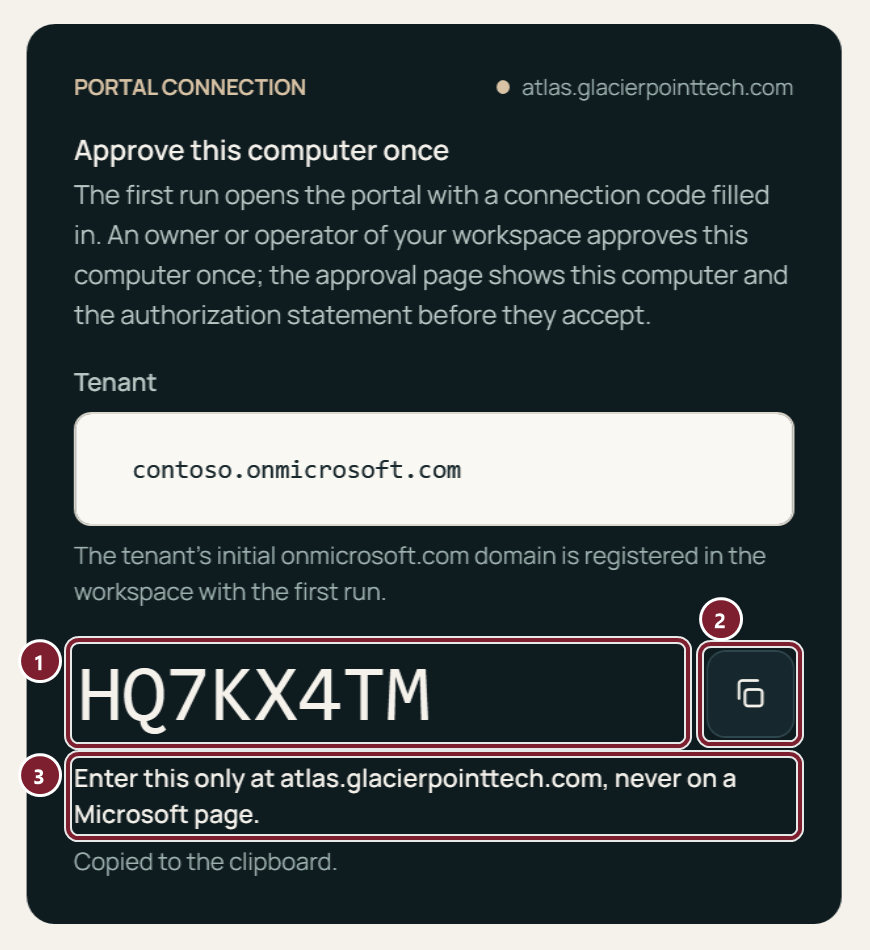
- 1The connection code.
- 2Copies the code again, if you need to type it in the portal yourself.
- 3Enter the code only on the portal, never on a Microsoft page.
In the portal, sign in if asked. Only an owner or an operator of the workspace can approve.
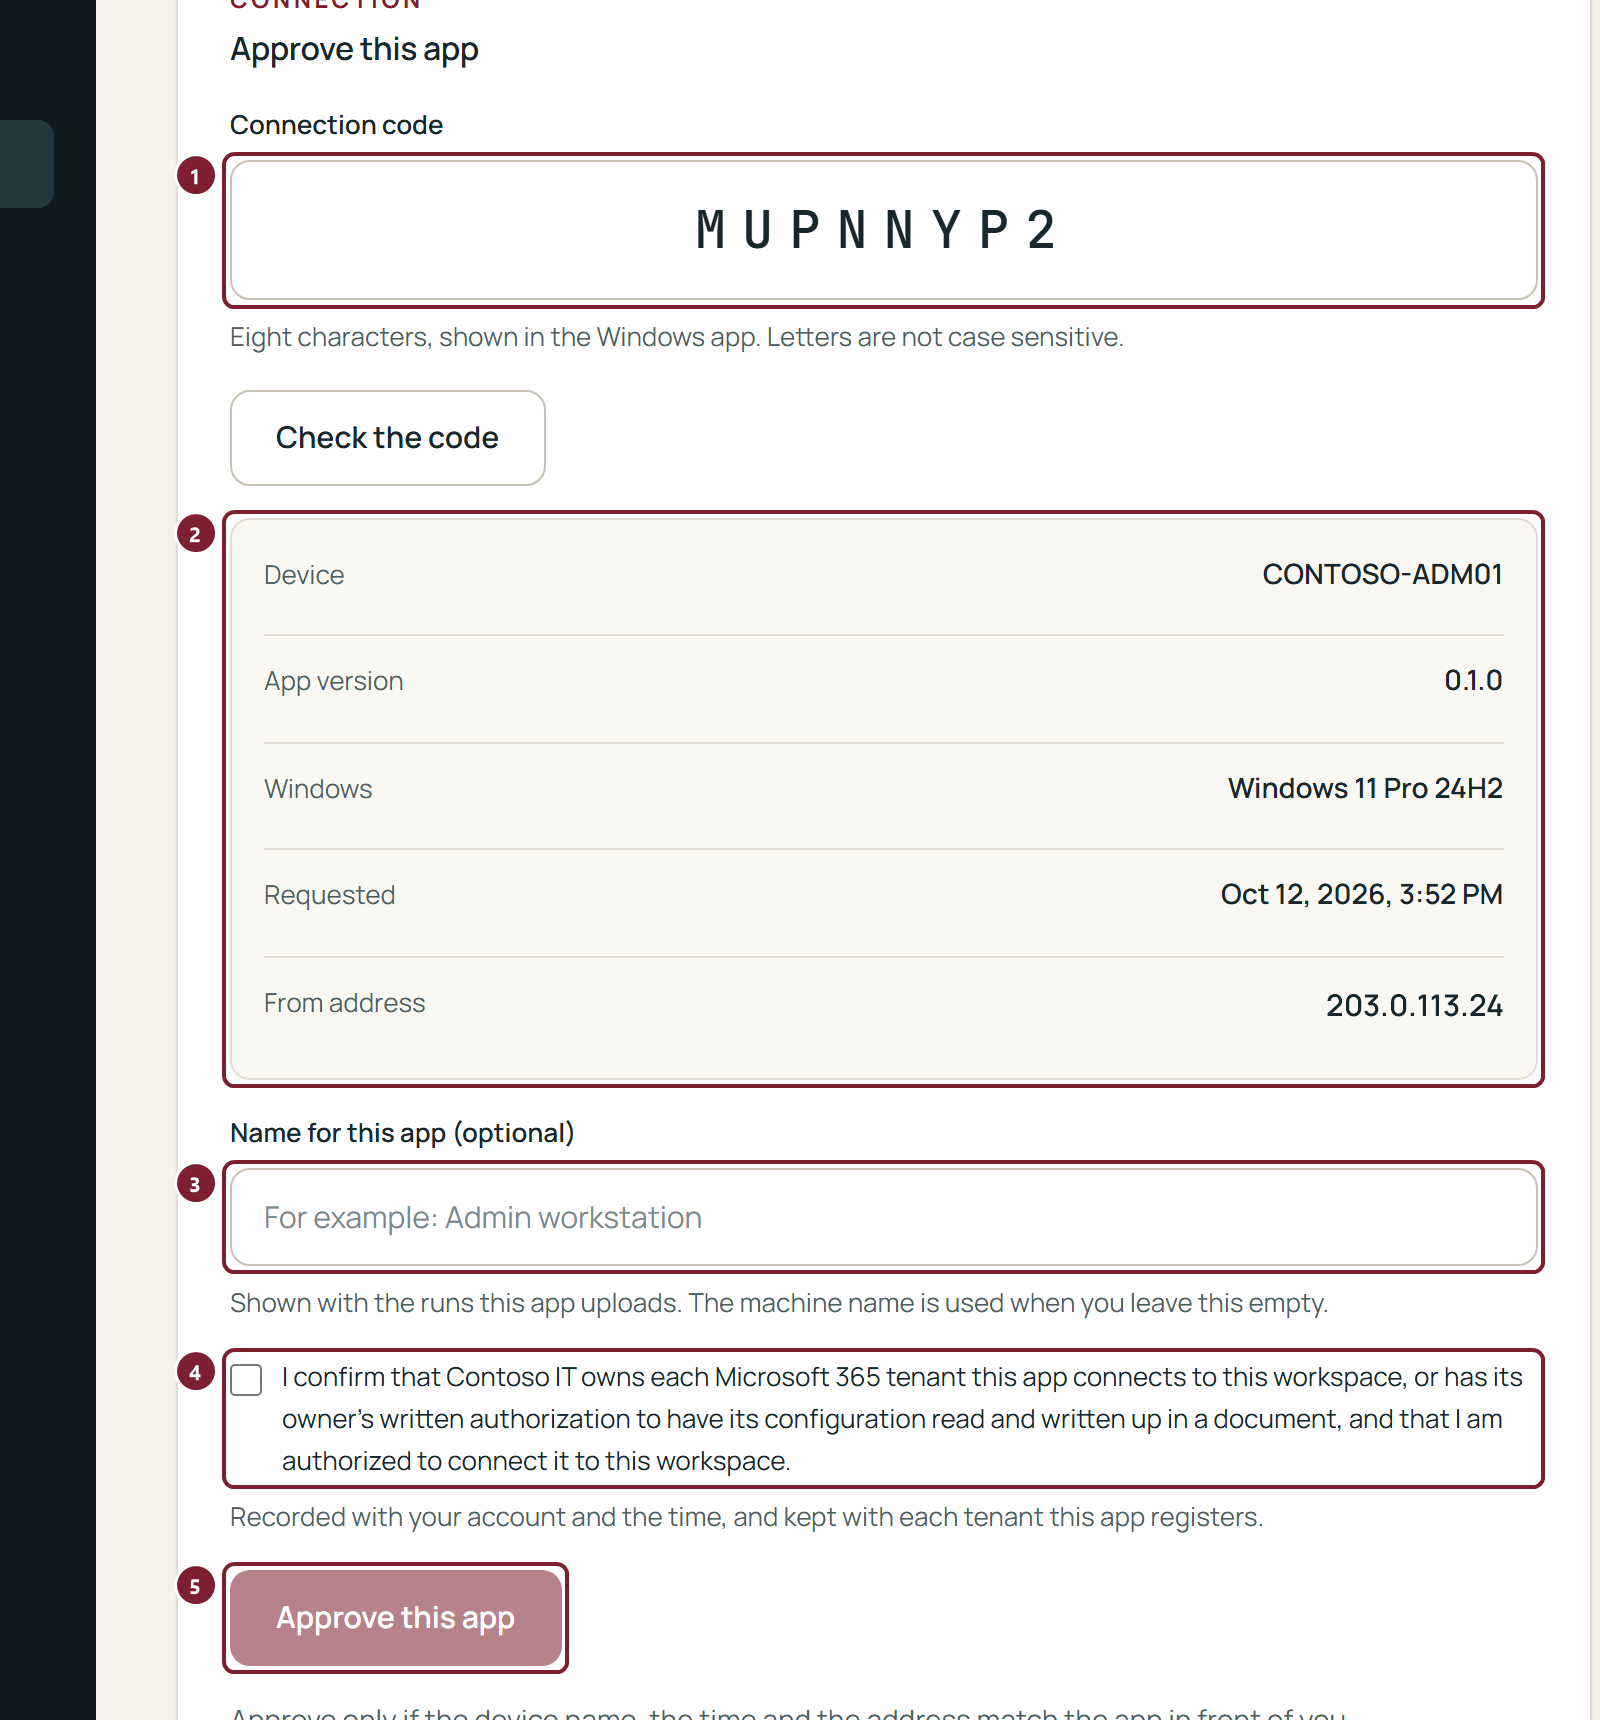
- 1The code from the app. Type it and choose Check the code if the page did not open with it already filled in.
- 2The computer that asked: its name, the app version, Windows, when and from which address. Approve only when they are the computer in front of you.
- 3A name for the app, such as "Admin workstation", shown in Settings and in the activity log. Leave it empty to use the machine name.
- 4The authorization statement: your organization owns each Microsoft 365 tenant this app connects to the workspace, or has its owner's written authorization to have its configuration read and written up in a document, and you may connect it. It is recorded with your account and the time and kept with each tenant the app registers.
- 5Approve this app becomes available once the statement is ticked. Within a few seconds the app shows that it is connected and the run goes on.
An owner can remove a connected app at any time in Settings, under Windows app (section 10).
3. Run
The app signs in on Microsoft's own page in your browser, with an administrator account of the tenant. No password is typed in the app; the sign-in is held in memory for the run and discarded when it ends. Then it reads the settings of the tenant, read-only, and uploads one sealed run.
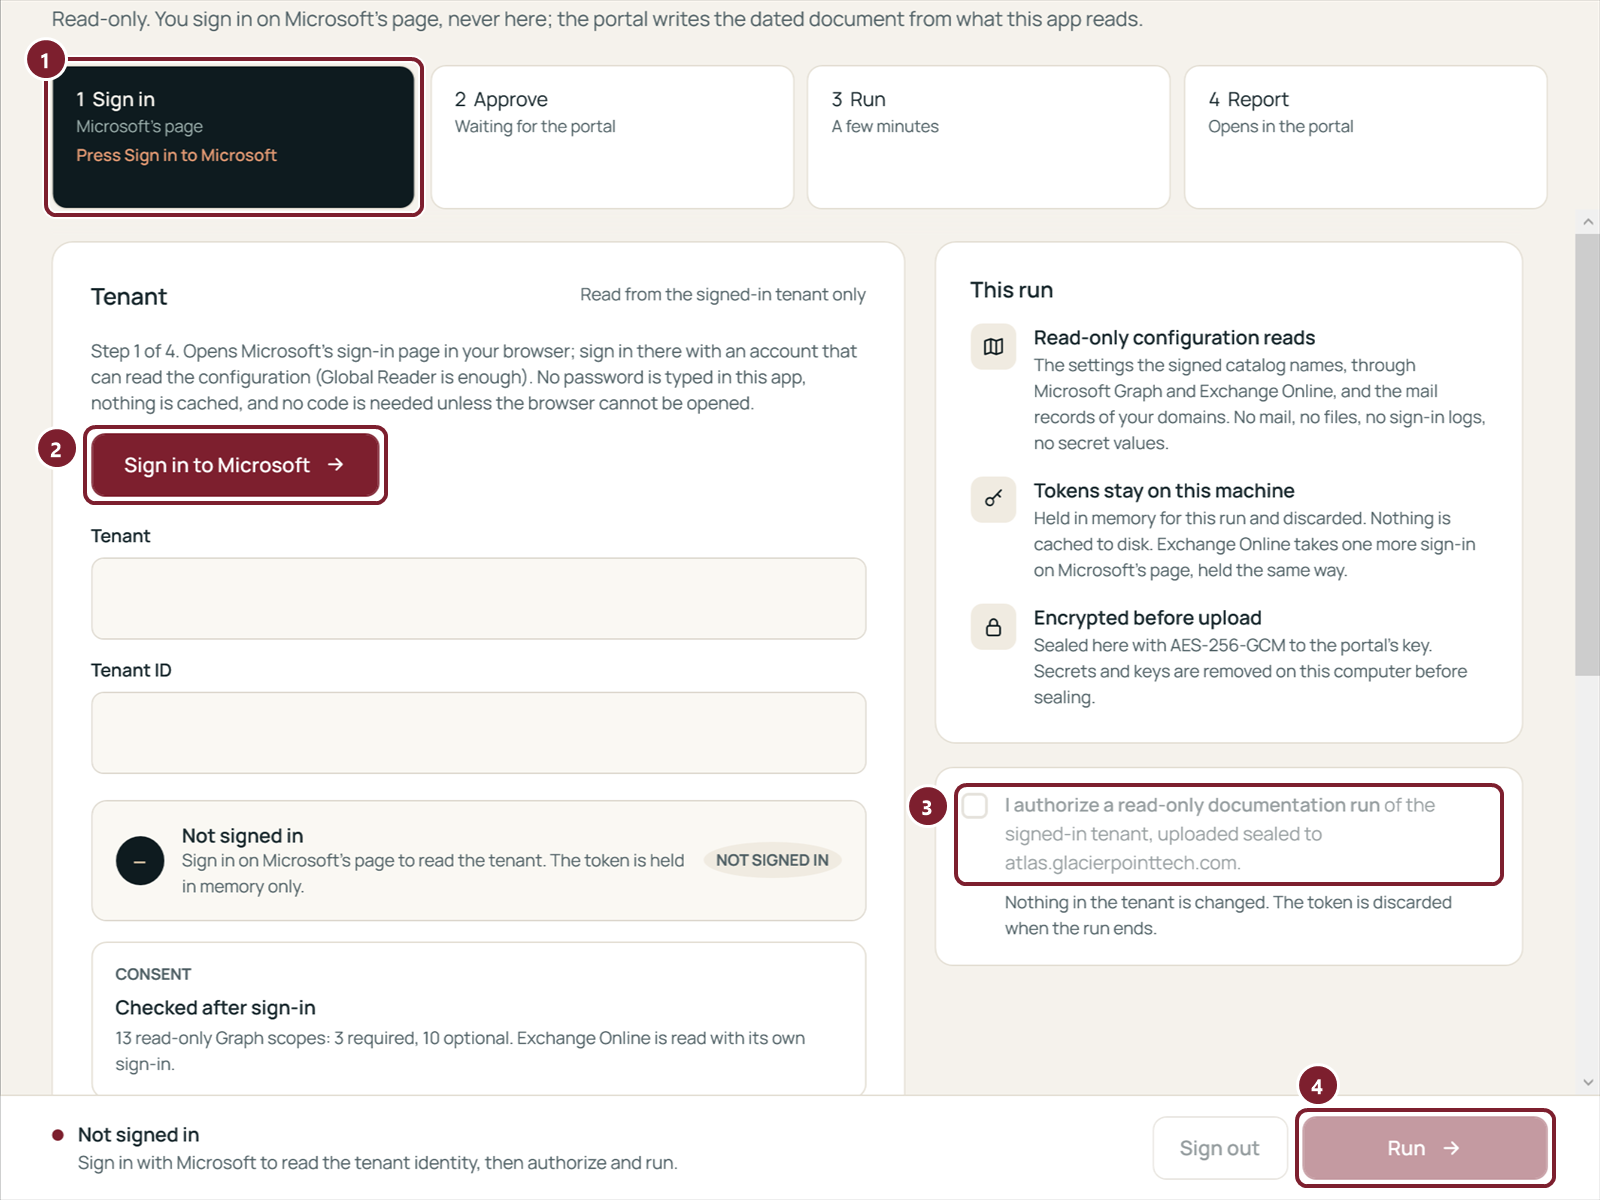
- 1The four steps of a run: Sign in, Approve, Run, Report. The line in color under the current step says what to do next.
- 2Sign in to Microsoft opens Microsoft's sign-in page. Microsoft's page names the app the sign-in is for; that is expected.
- 3The authorization box: "I authorize a read-only documentation run of the signed-in tenant, uploaded sealed to the portal." Tick it to confirm that you may have this tenant documented.
- 4Run starts the run once you are signed in and the box is ticked.
The consent card
The app asks for thirteen read-only Microsoft Graph permissions: three are required (Organization.Read.All, Directory.Read.All and Domain.Read.All) and ten are optional, among them the five that read Intune. After the sign-in, the Consent card says how many were granted.
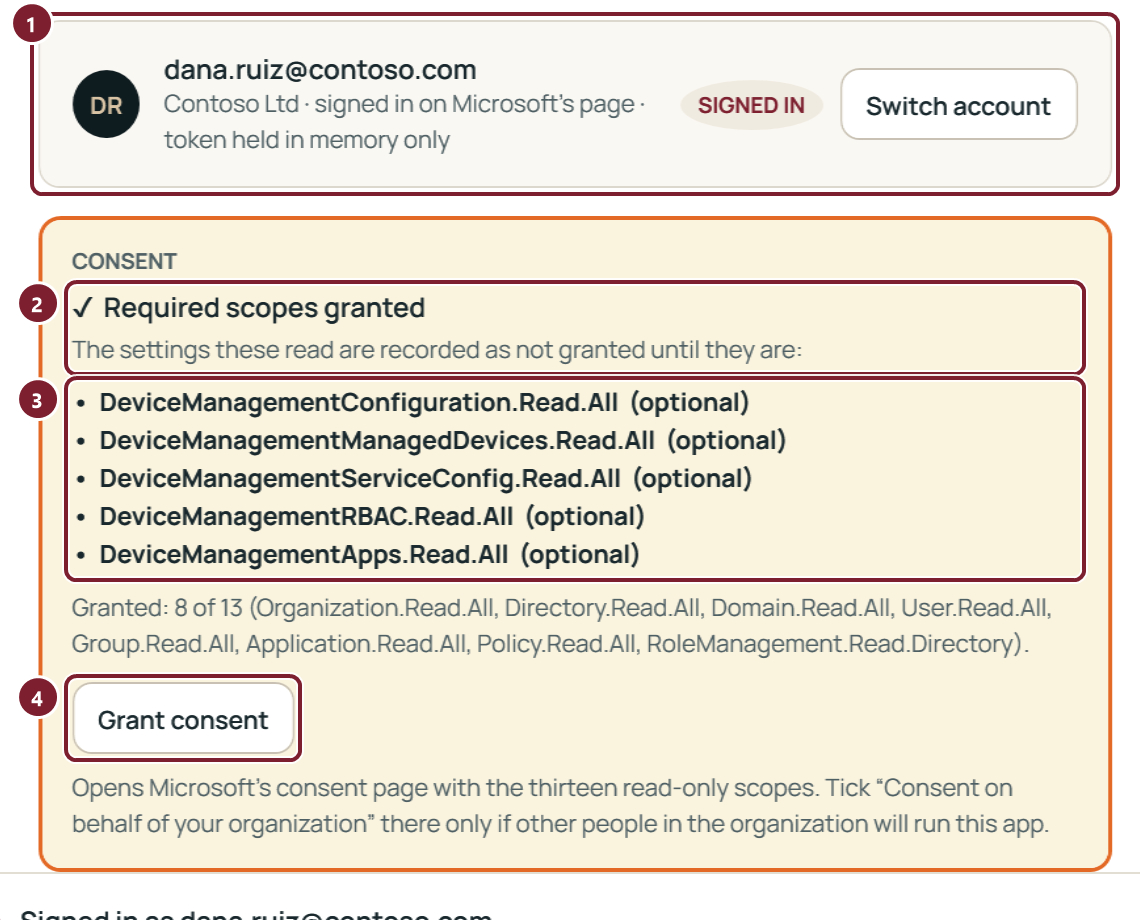
- 1The account you signed in with and its organization. Check that it is the tenant you meant; Switch account signs in again with another.
- 2The consent card: Granted: 8 of 13. When all thirteen are granted it says so.
- 3The permissions that are missing. The settings they read are recorded as not granted, and the document says so in its register of what was not collected (section 4). A missing required permission stops the run before anything is read.
- 4Grant consent signs in again on Microsoft's page and asks for the missing permissions. Tick "Consent on behalf of your organization" there only if other people in the organization will run the app.
The Exchange Online module
Mail flow and mail protection (sections 4 and 5 of the document) are read through Microsoft's Exchange Online PowerShell module, in one more sign-in on Microsoft's page. The card under the consent card says whether the module was found on this computer.
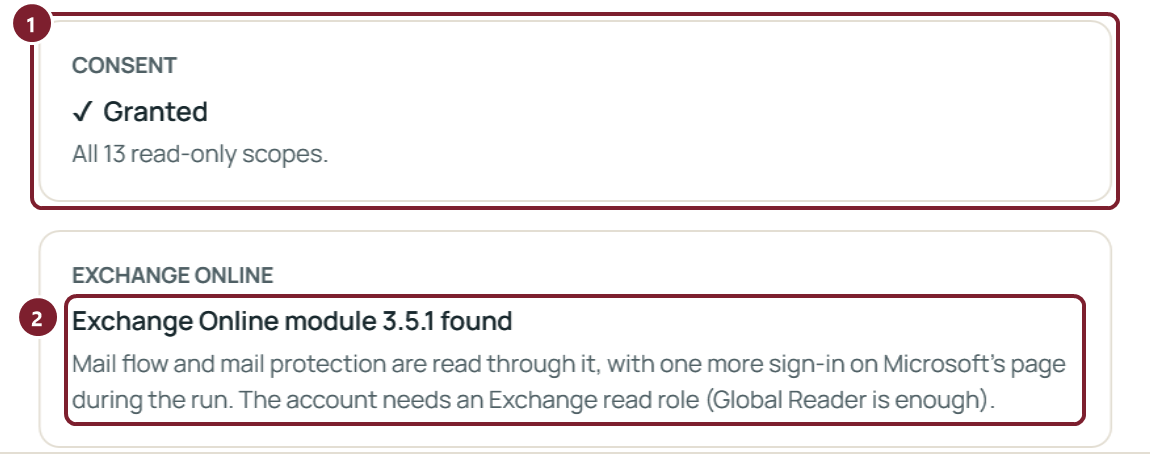
- 1Granted: all thirteen read-only scopes.
- 2The module and what it needs: one more sign-in, with an account that has an Exchange read role (Global Reader is enough). Without the module, the two sections are skipped and say which module they need; run again after installing it.
During the run, and when it is done
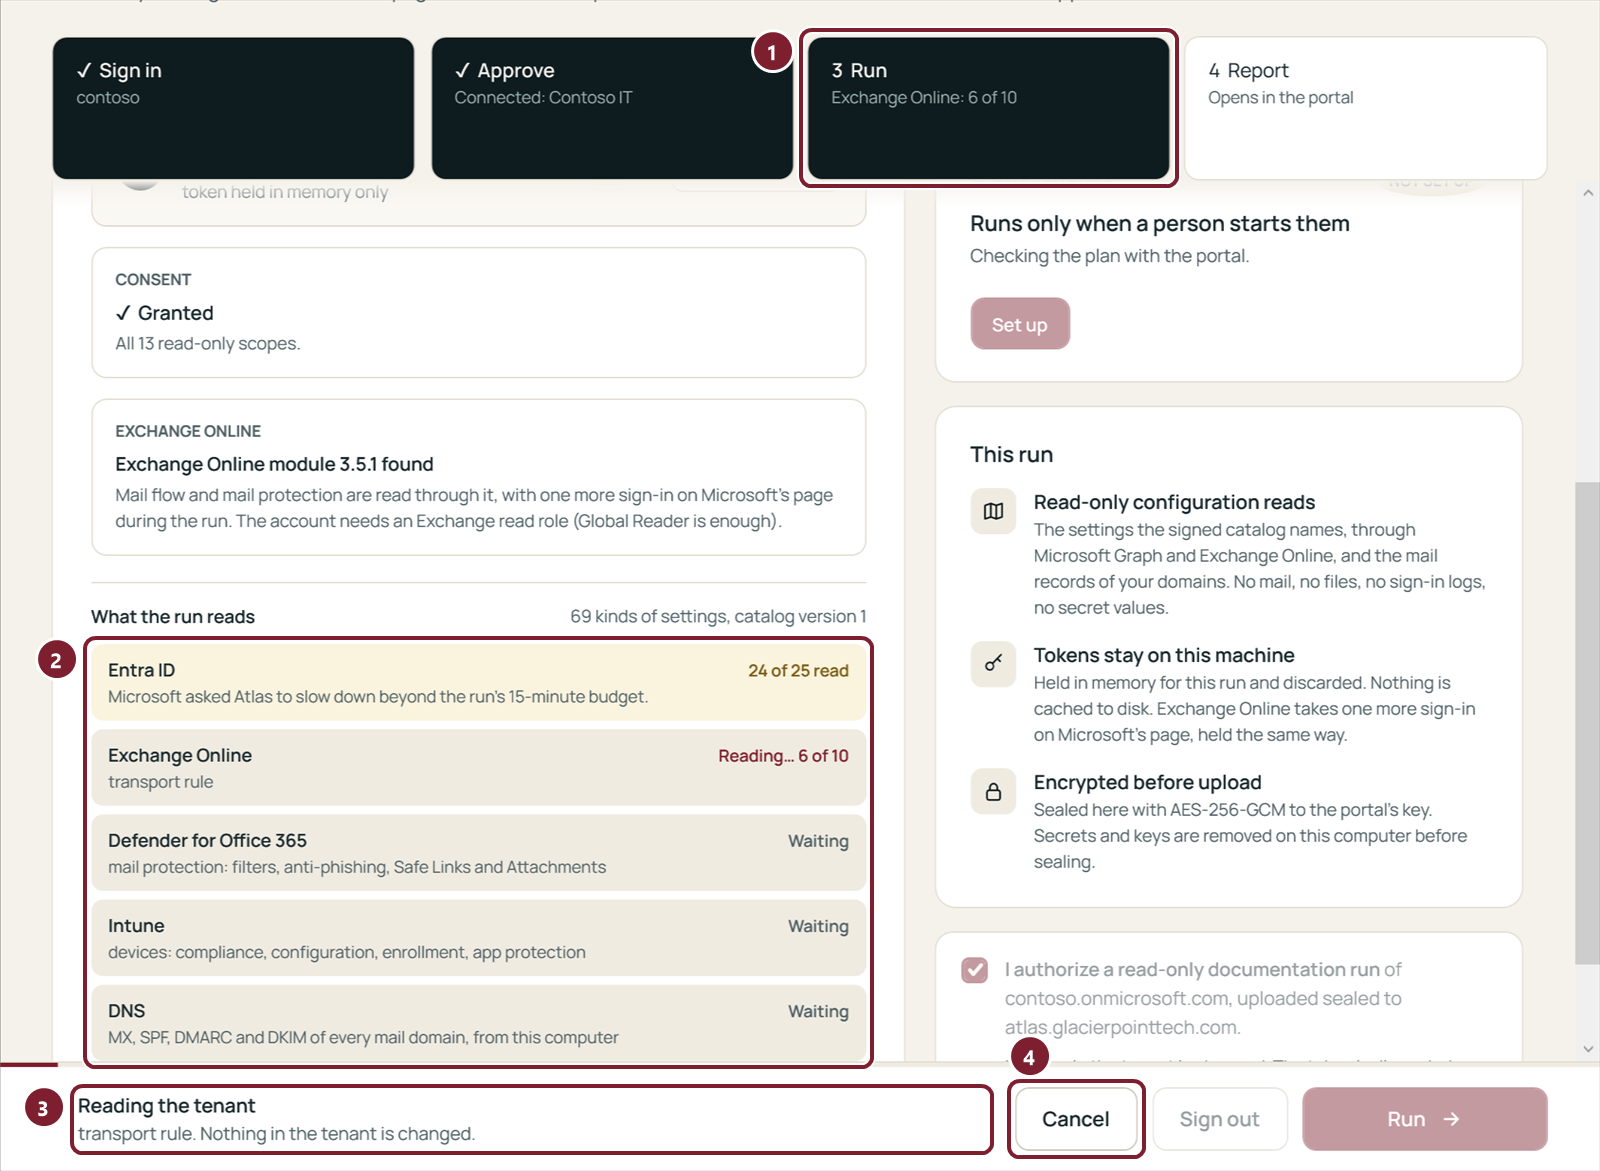
- 1Step 3, Run.
- 2What is being read, workload by workload: the identity, sign-in and access, mail flow, mail protection, devices, collaboration and licensing settings, each with what it read.
- 3What the app is reading now. Nothing in the tenant is changed.
- 4Cancel stops the run; nothing is uploaded.
The app seals what it read on your computer, uploads it to your workspace and opens the document's page in your browser.
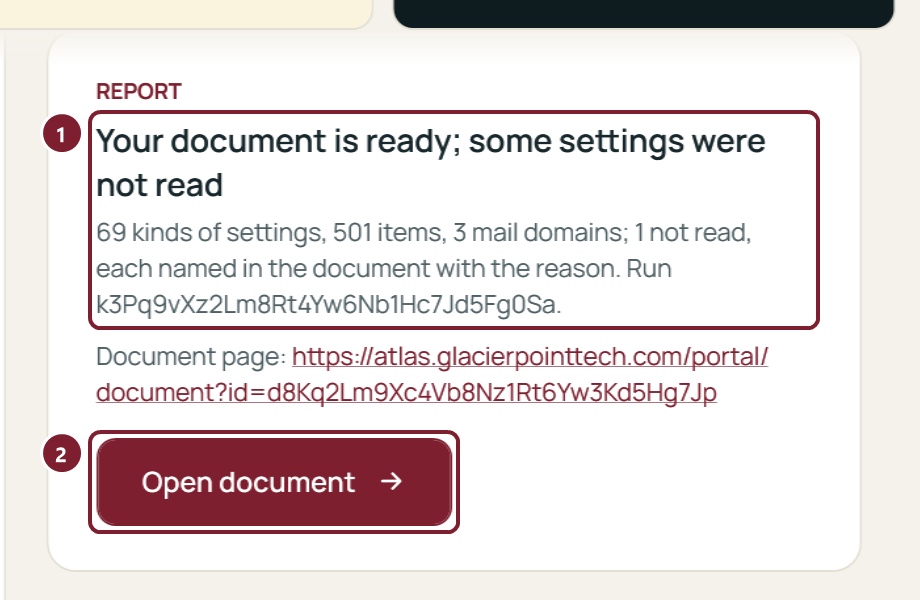
- 1The result. "Document ready, with limits" means some settings were not read; the document says which and why.
- 2Opens the document's page again, if you closed it.
4. Read the document
In the portal, open Tenants and choose Open beside a tenant: its newest document opens as a page. The document records the tenant's configuration as it was on the day of the run, in plain sentences, tables and diagrams.
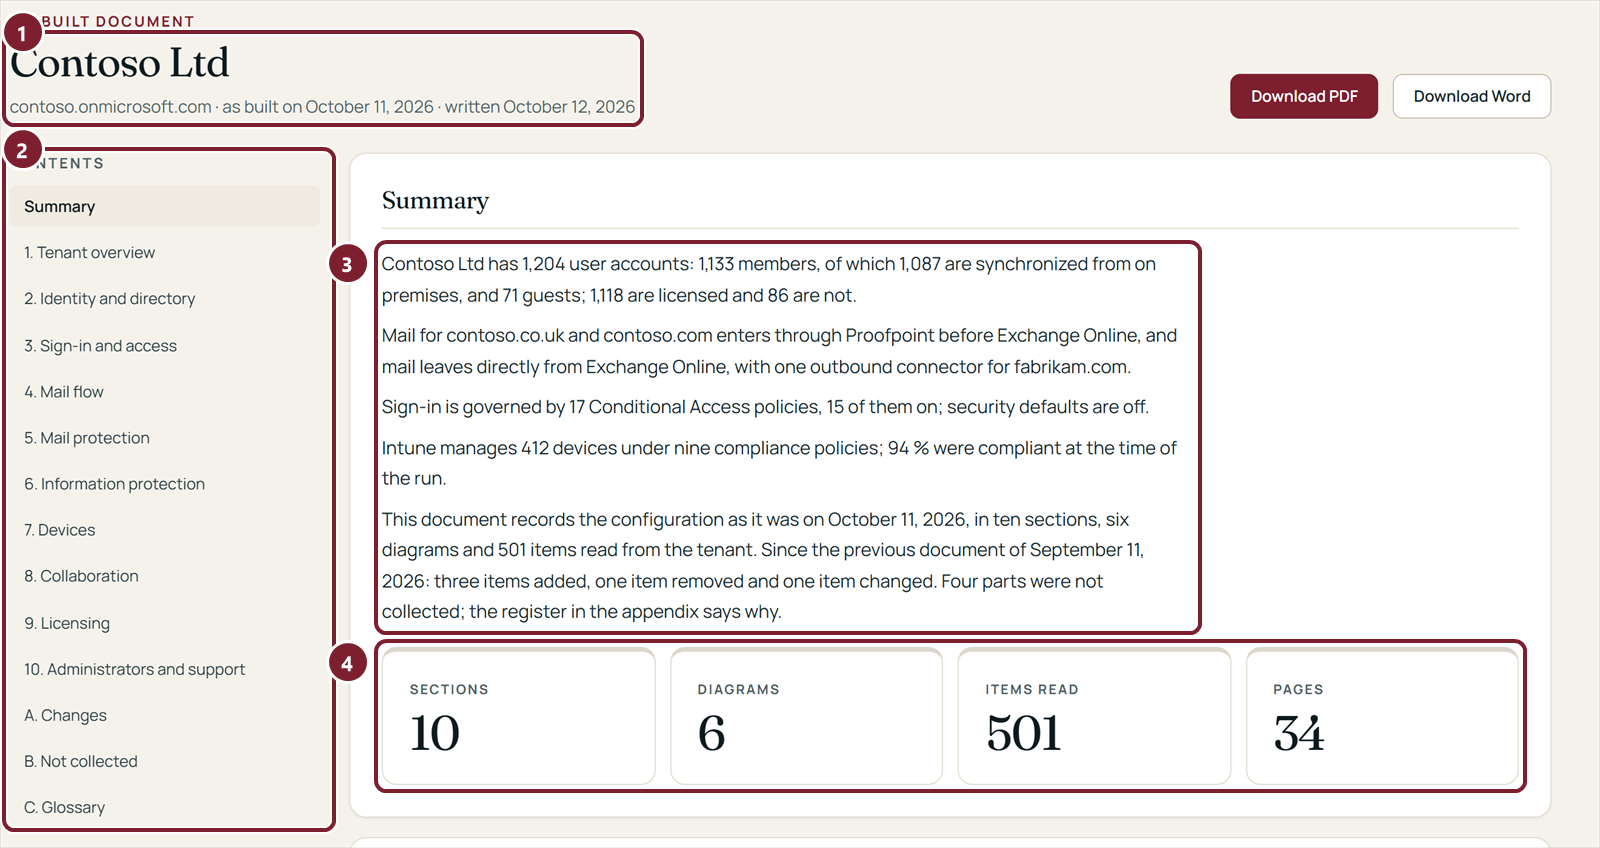
- 1The tenant, the day the settings were as built, and the day the document was written.
- 2The contents: the summary, ten numbered sections, and three appendices (the changes since the document before, what was not collected, and a glossary). The page follows you as you read.
- 3The summary: the tenant in five or six sentences, written from the run.
- 4The size of the document: sections, diagrams, items read from the tenant, and pages when printed.
The sections and the diagrams
The ten sections are: tenant overview, identity and directory, sign-in and access, mail flow, mail protection, information protection, devices, collaboration, licensing, and administrators and support. Each opens with a paragraph, a diagram where the section has one, and the tables behind it.
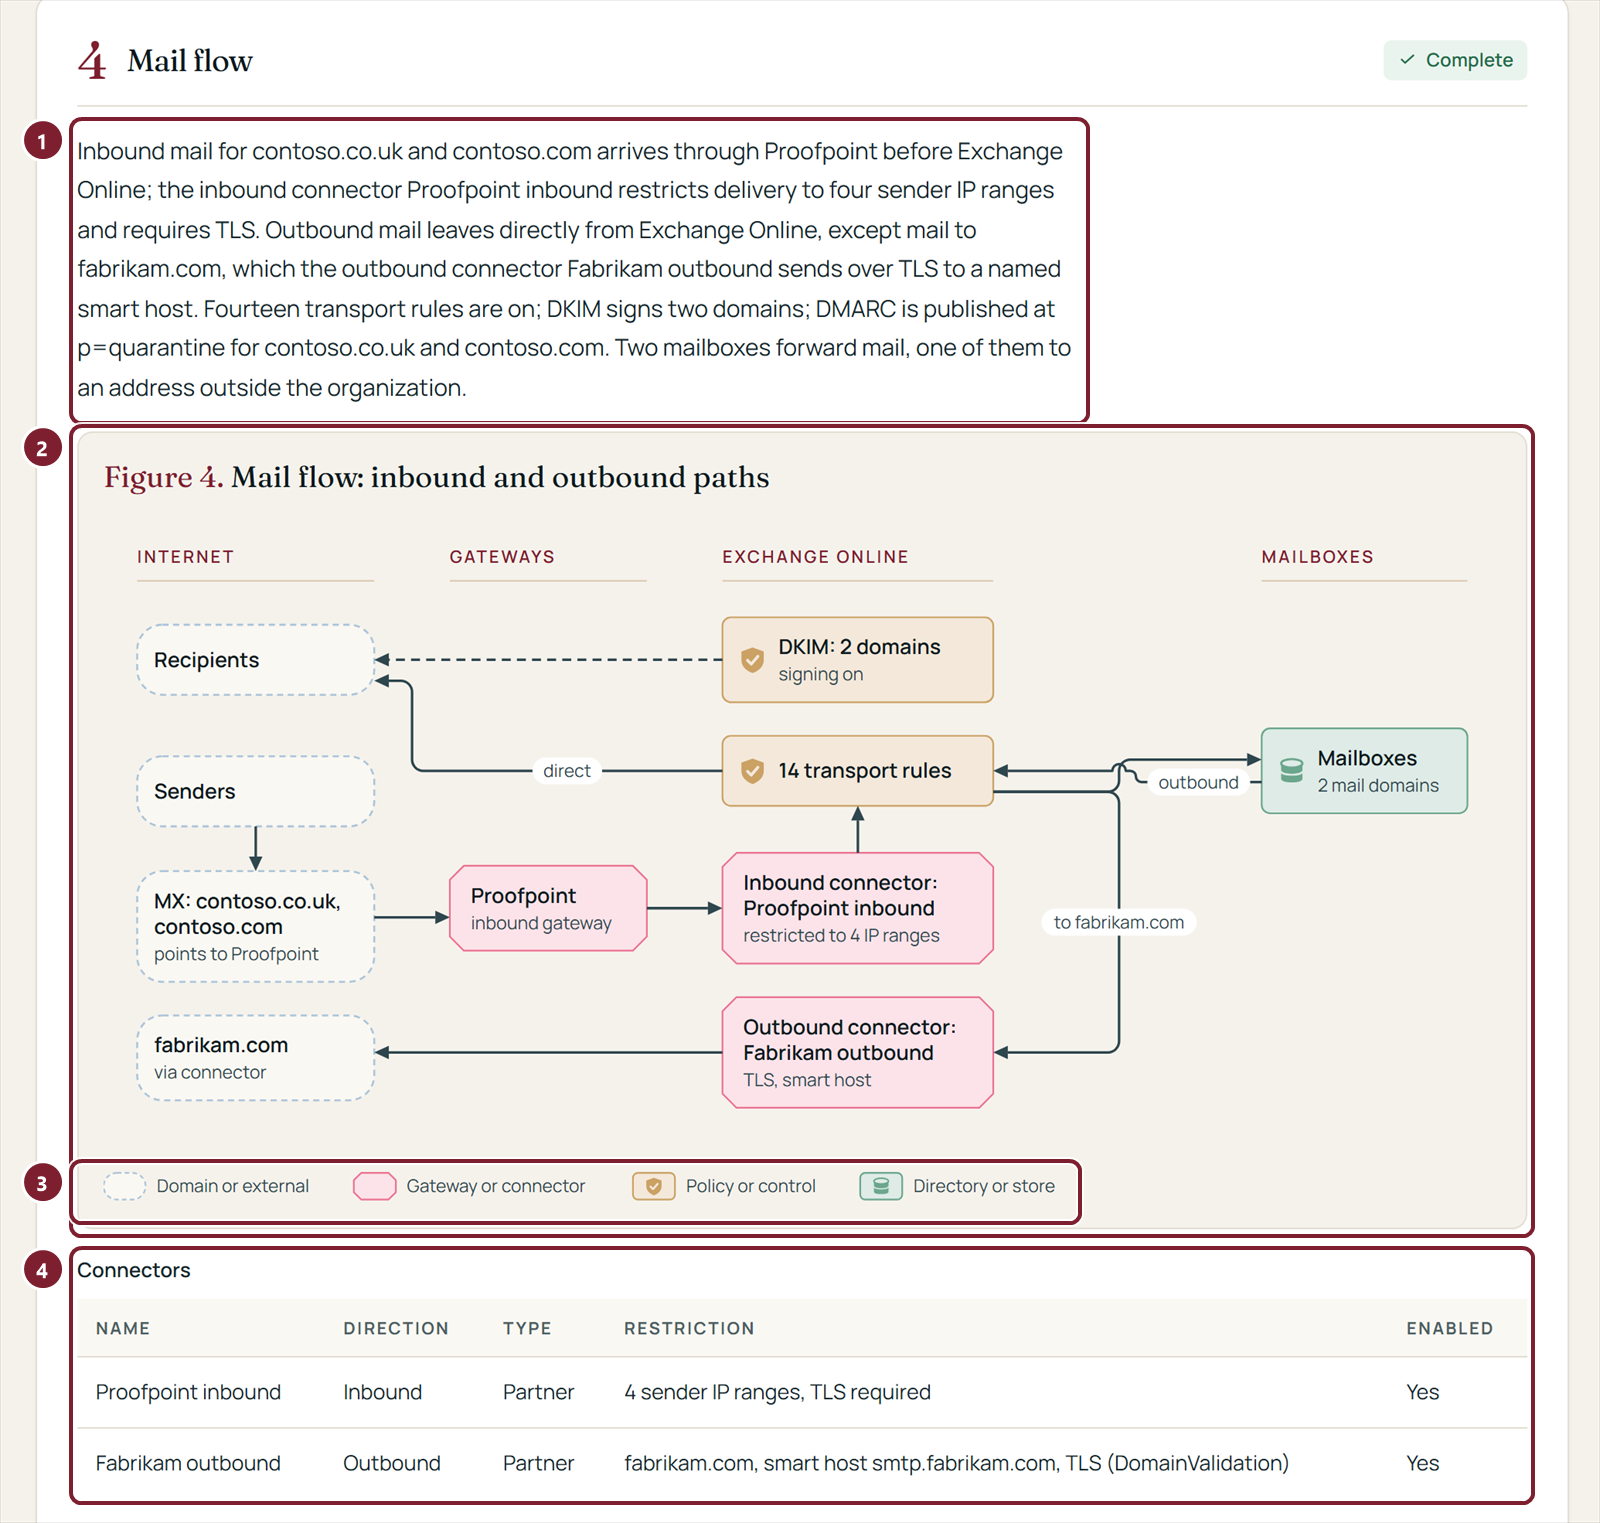
- 1What the section found, in sentences. Every number comes from the run.
- 2The diagram of the section, drawn from the same run: here the paths inbound and outbound mail take.
- 3The legend: a domain or something external, a gateway or connector, a policy or control, a directory or store.
- 4The table behind the diagram, one row for each item read.
What was not collected. A setting the run could not read is never printed as zero. The section says so in a fixed sentence, and Appendix B lists each part with the reason: a permission that was not granted, a Microsoft read that failed, a PowerShell module that was not found, or a part a later version of the app will read. Sections 6 and 8 print as a short note naming the module they need until then.
5. Download the PDF and the Word file
The document is also a PDF and a Word file, with the same sections and diagrams. Word is for editing the text and handing it on under your own template; it comes with the paid plans, and on the Preview the PDF carries a Preview band.

- 1Download PDF: the document with its cover, contents and page numbers, ready to hand to whoever asked for it.
- 2Download Word: the same document as a Word file.
- 3The day of the run and the day the document was written, printed on the cover as well.
You can also download either file from the list of tenants, without opening the document.

- 1The date of the newest document and its length in pages.
- 2How many changes there are since the document before (section 7).
- 3Open shows the page; PDF and Word download the files.
6. Notes and the cover
The tenant's own page, reached from its name in the Tenants table, lists every document of the tenant and holds what you add to the next one: who it is prepared for, and your notes. The page lists every document of the tenant, newest first; an older document stays as it was printed.
Prepared for
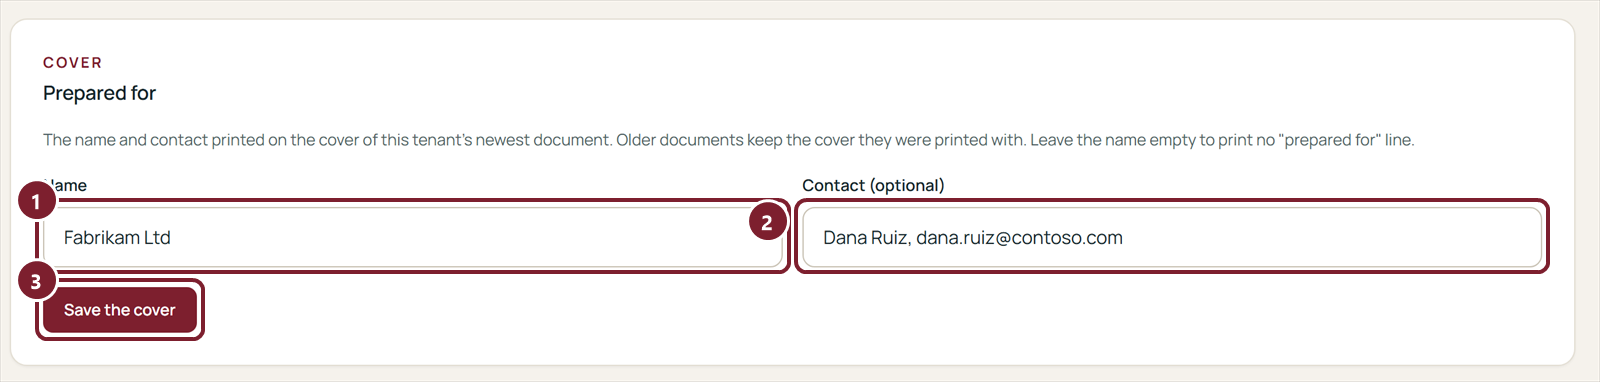
- 1Name: the name printed on the cover as "Prepared for". Leave it empty to print no "prepared for" line.
- 2Contact (optional): a person or an address printed beside it.
- 3Save the cover. It applies to the newest document, which is rebuilt; older documents keep the cover they were printed with.
The workspace's cover and logo. On the One-time, Watch and MSP plans an owner can also set the name and contact of whoever prepares the documents and a logo, a PNG of at most 512 KB. They are printed on the cover of every tenant's document, on the page, in the PDF and in the Word file, from the next document on. In an MSP workspace this puts your own name and mark on each client's document.
Notes
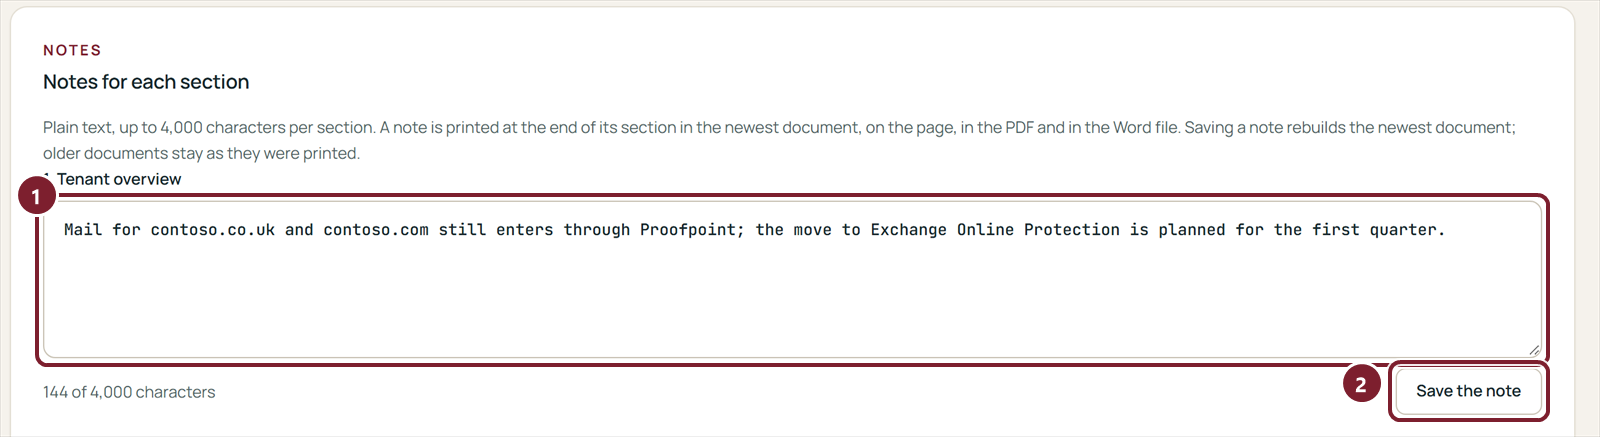
- 1A note for one section: plain text, up to 4,000 characters. It is printed at the end of its section, on the page, in the PDF and in the Word file. There is one box for each of the ten sections.
- 2Save the note rebuilds the newest document with it.
7. The change log
From the second document of a tenant on, Appendix A compares the run with the one before it, item by item, and lists what was added, removed or changed. The list of tenants shows the count beside each document, and the first document says "First document".
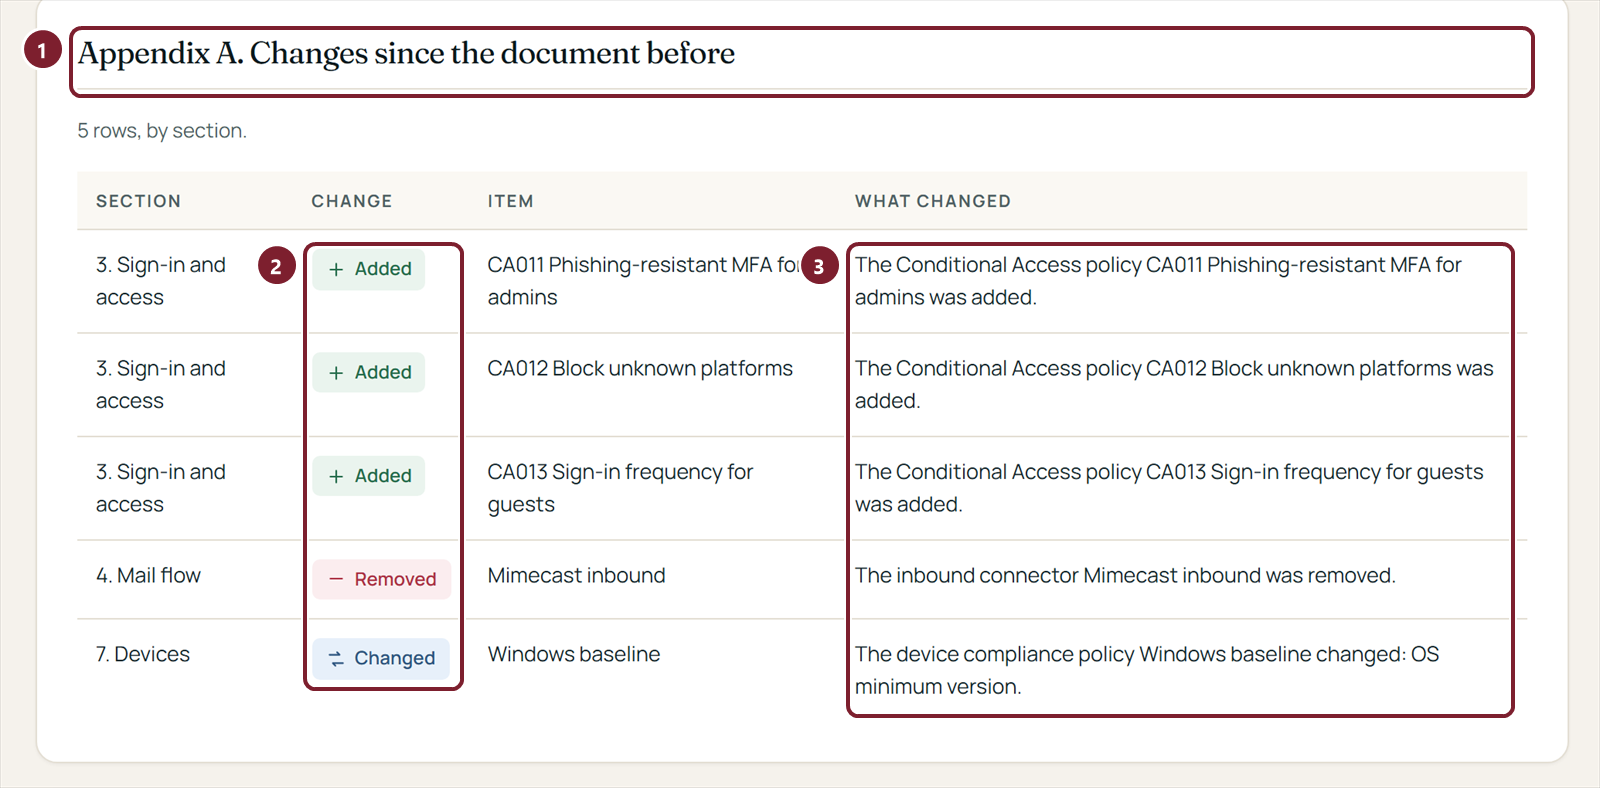
- 1The appendix and the number of rows. It lists the sections in order.
- 2The kind of change: Added (the item was not in the document before), Removed (it is gone) or Changed (it is the same item, with another setting).
- 3What changed, in a sentence: for example a Conditional Access policy that was added, a connector that was removed, or the setting of a policy that changed.
The change log compares only what both runs read. A part that was not collected in one of them is not reported as removed. On the Watch and MSP plans, each new document is also announced by mail to the addresses you choose in Settings (section 10): "New Atlas document for the tenant: N changes since the date of the document before". The mail links to the page; it never attaches the file.
8. Scheduled monthly runs
On the Watch and MSP plans the app can run by itself every month, so that each month's document and its change log are waiting for you. It is the only place where the product writes in your directory, and only what you confirm: a registration of its own, "GlacierPoint Atlas scheduled run", with a certificate on the computer that runs it and no secret. Runs you start by hand keep working with or without a schedule.
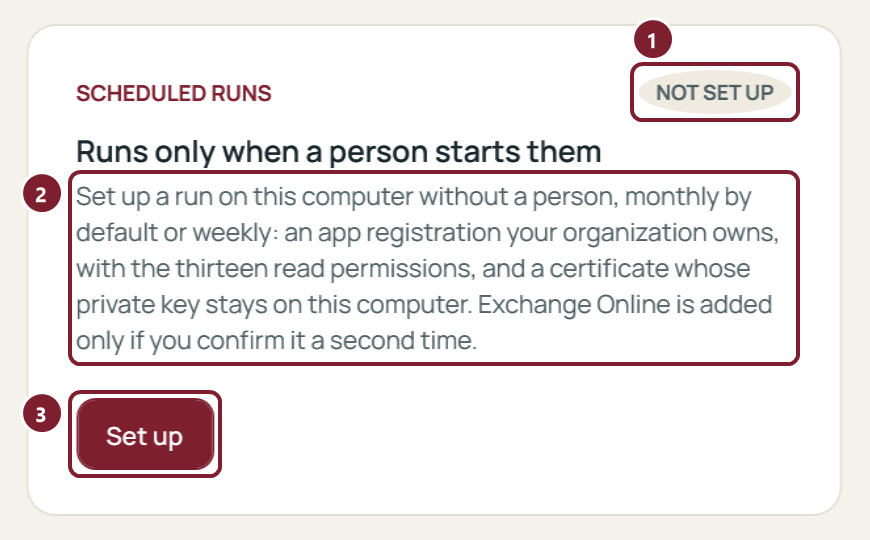
- 1The state: not set up, or set up.
- 2What the card says about the plan. On a plan without scheduled runs it says so and offers nothing.
- 3Set up opens the wizard. It asks for a sign-in as a Global Administrator, with the permissions of the setup only; they are taken out of the consent again at its end.
The plan, and your confirmation
The wizard reads what exists, then shows the plan, line by line, and writes nothing until you type your tenant's domain to confirm it.
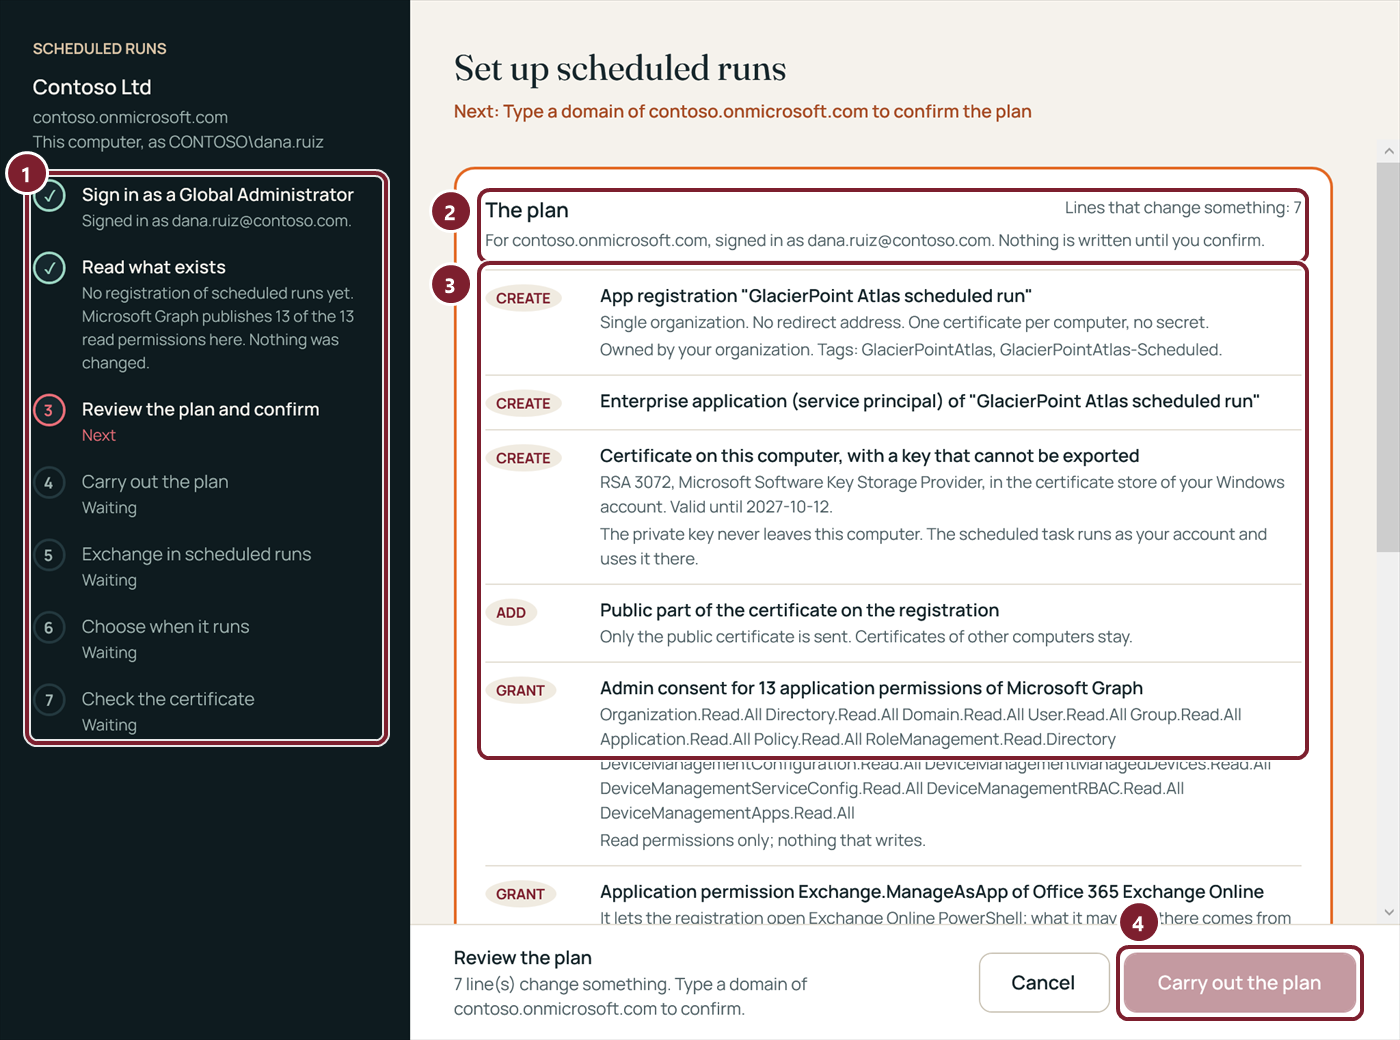
- 1The steps: sign in, read what exists, review the plan and confirm, carry out the plan, Exchange, choose when it runs, check the certificate.
- 2How many lines change something. Nothing is written until you confirm.
- 3The lines: the registration (single organization, no secret), its enterprise application, a certificate whose private key never leaves this computer (valid for one year), its public part, and admin consent for the thirteen read permissions as application permissions. Read permissions only; nothing that writes.
- 4Carry out the plan becomes available once you have typed the domain. Every request it makes is kept in a journal on this computer.
The Exchange confirmation card
To read mail flow and mail protection without you, the registration needs two more things, and the wizard asks for them on a card of their own, apart from the plan.
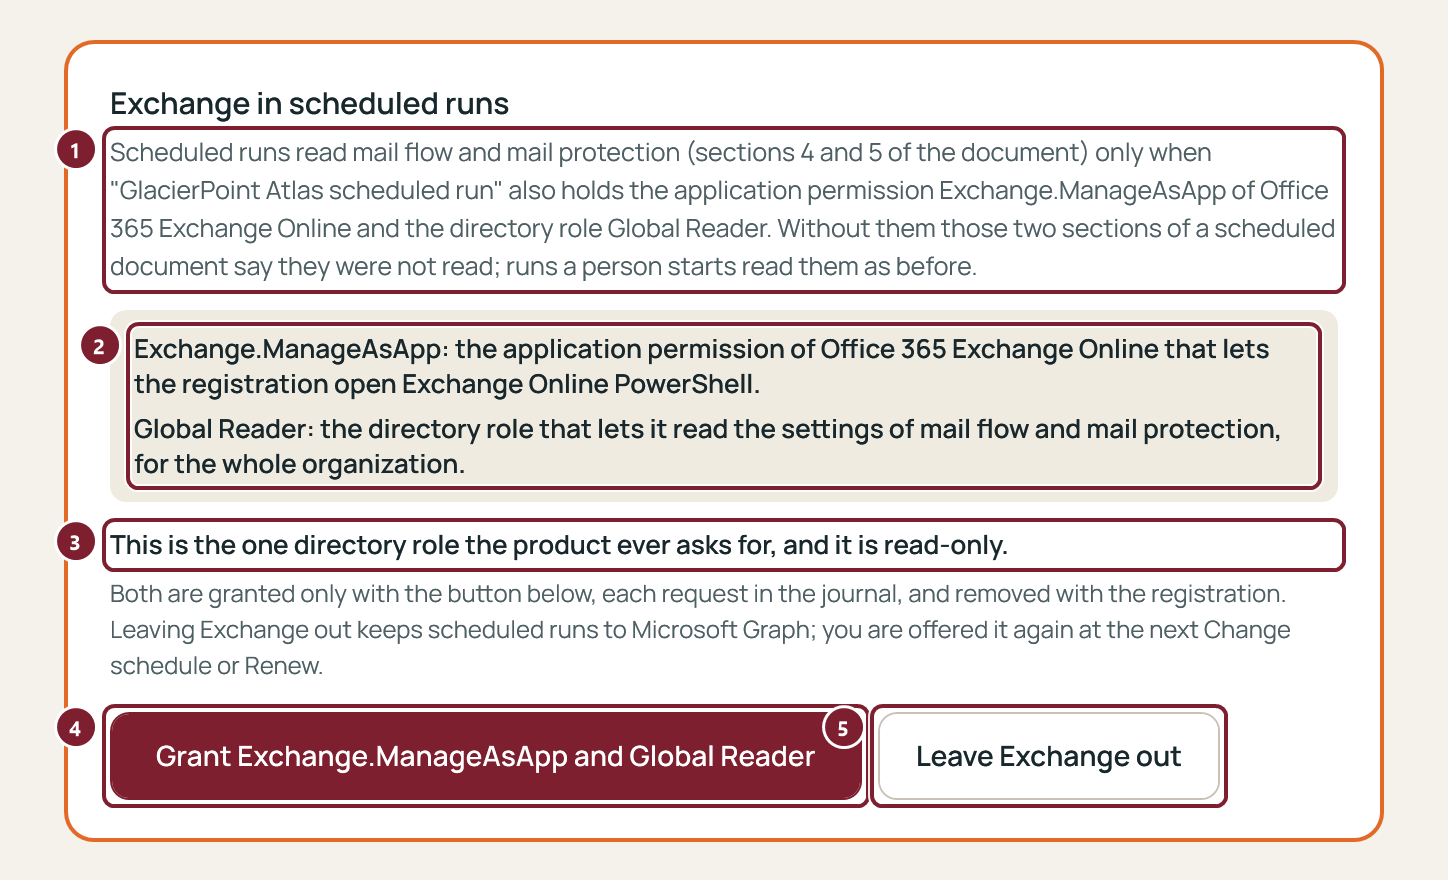
- 1Why: without these, the two Exchange sections of a scheduled document say they were not read.
- 2The two grants: the application permission
Exchange.ManageAsAppof Office 365 Exchange Online, and the directory role Global Reader for the registration. - 3"This is the one directory role the product ever asks for, and it is read-only." Both grants are removed with the registration.
- 4Grant Exchange.ManageAsApp and Global Reader grants both, each request in the journal.
- 5Leave Exchange out keeps scheduled runs to Microsoft Graph. You are offered Exchange again the next time you change the schedule or renew the certificate.
The three run modes
The schedule is monthly on a day of the month (the 1st at 06:00 unless you choose otherwise) or weekly. Windows starts the run up to 30 minutes after the time so that computers do not all call at once. The task runs GlacierPointAtlas.exe on the computer that set it up, for two hours at most.
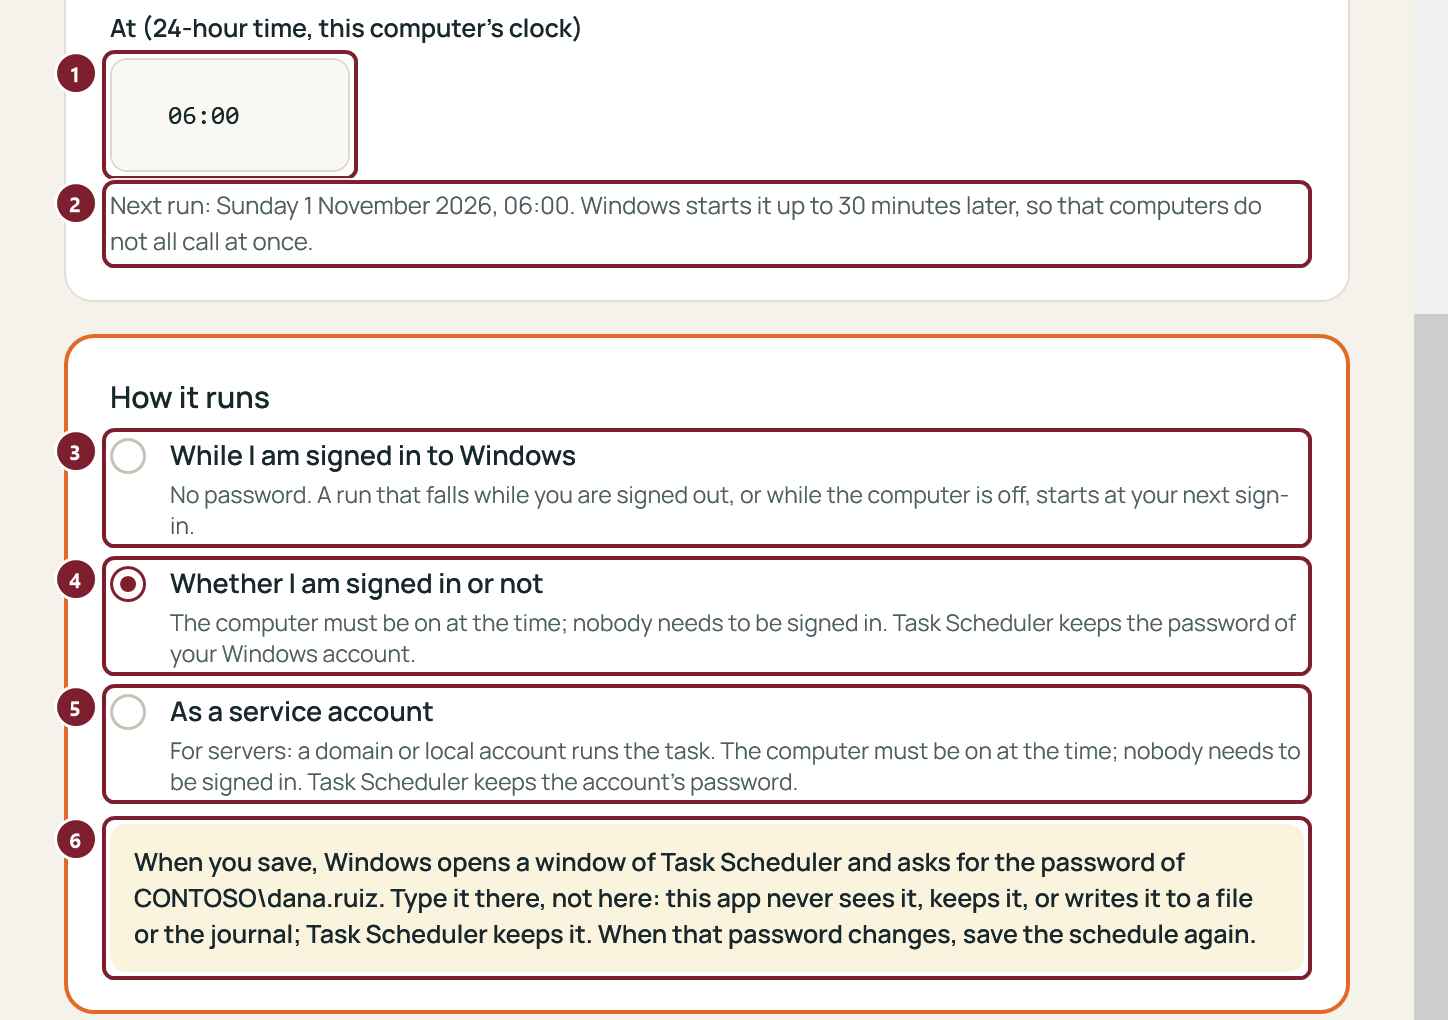
- 1The time of day, on this computer's clock.
- 2The next run, as the schedule will make it.
- 3While I am signed in to Windows: no password. A run that falls while you are signed out starts at your next sign-in.
- 4Whether I am signed in or not: the computer must be on; nobody needs to be signed in.
- 5As a service account, for servers: a domain or local account runs the task.
- 6For the last two, Windows opens a window of Task Scheduler and asks for the password there. The app never sees it and never keeps it; when it changes, save the schedule again.
Once it is set up
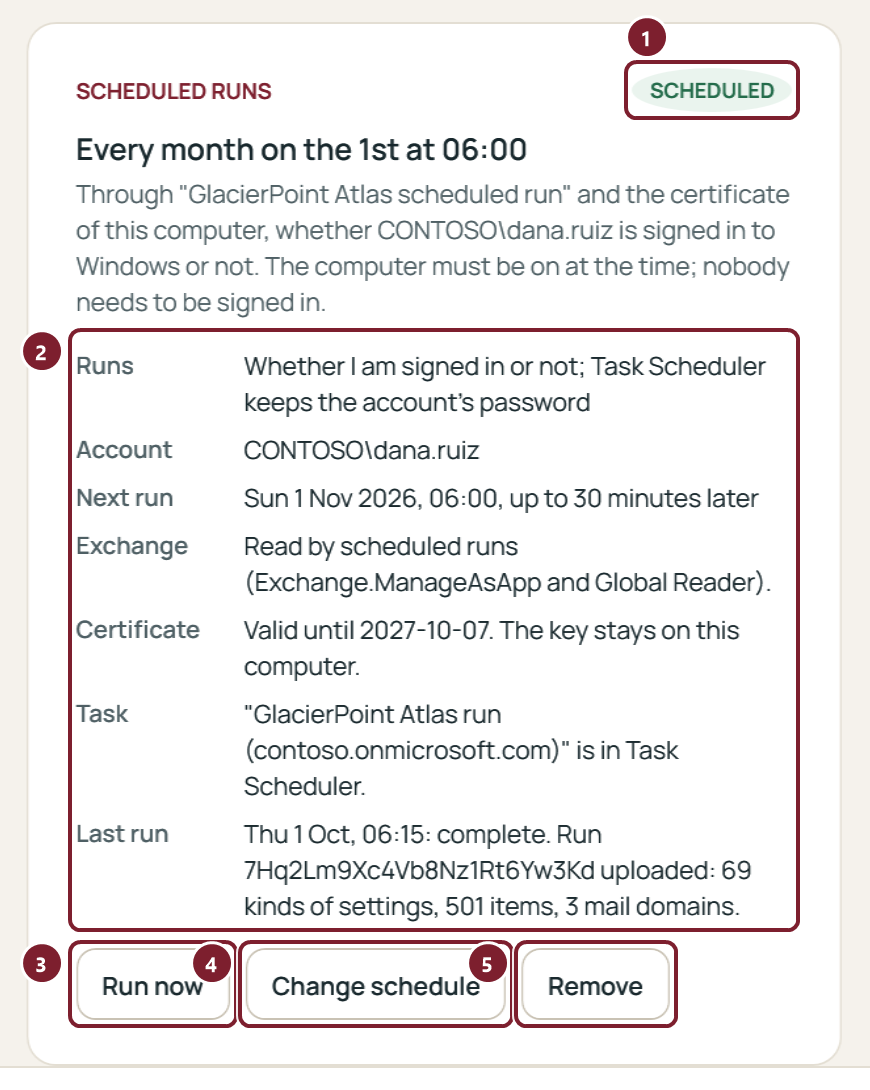
- 1Set up, monthly.
- 2The facts: when it runs, whether Exchange is included, when the certificate ends, the task and the result of the last run.
- 3Run now tries a whole run once.
- 4Change schedule replaces the task; the registration and the certificate stay.
- 5Remove takes everything out in the reverse order: the Global Reader assignment, the Exchange permission, the Graph permissions, the enterprise application and the registration.
The certificate is valid for one year. The portal mails the owners 30 days before it ends, and a Global Administrator's sign-in in the app renews it within 90 days of its end. If no scheduled run arrives for 40 days, the owners are told.
9. MSP tenants and their confirmation
An MSP workspace documents many tenants of customers. Every tenant has its own row in the Tenants table, its own documents and its own schedule, with its own registration and certificate: one task per tenant, on any computer you choose. The plan is $149 a month plus $19 a month per tenant, counted on the 1st; Settings shows the month's total.
Before a tenant's document is written, a member of the workspace confirms the tenant once. When the app registers a new tenant, it shows "waiting for confirmation" until then, and the tenant appears on the Connect an app page.
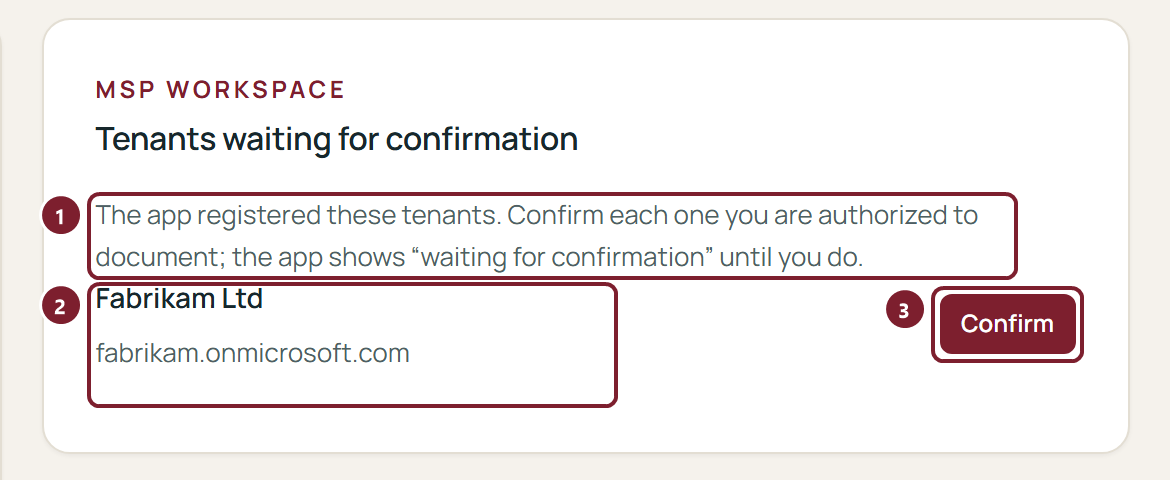
- 1What the card says: the app registered these tenants; confirm each one you are authorized to document.
- 2The tenant: its name and its initial domain. Check that it is a customer you are authorized to document.
- 3Confirm. The app can use the tenant from then on, and the confirmation is recorded with your name and the time.
10. Settings: names and members
Settings holds the workspace, its tenants, the connected apps, the members and your own account. Every change on the page is written to the activity log, which an owner can read.
Conceal names
Conceal names is a switch of the workspace. When it is on, the app blanks the names of people (users, administrators, owners of mailboxes) before it seals a run, so that the portal never receives them, and the document describes administrators and forwarding mailboxes by role and count; the sections say so. The Preview always conceals. Because the names are removed on your computer, a concealed run cannot be revealed later: turn the switch on before the run that should not carry names.
The tenants
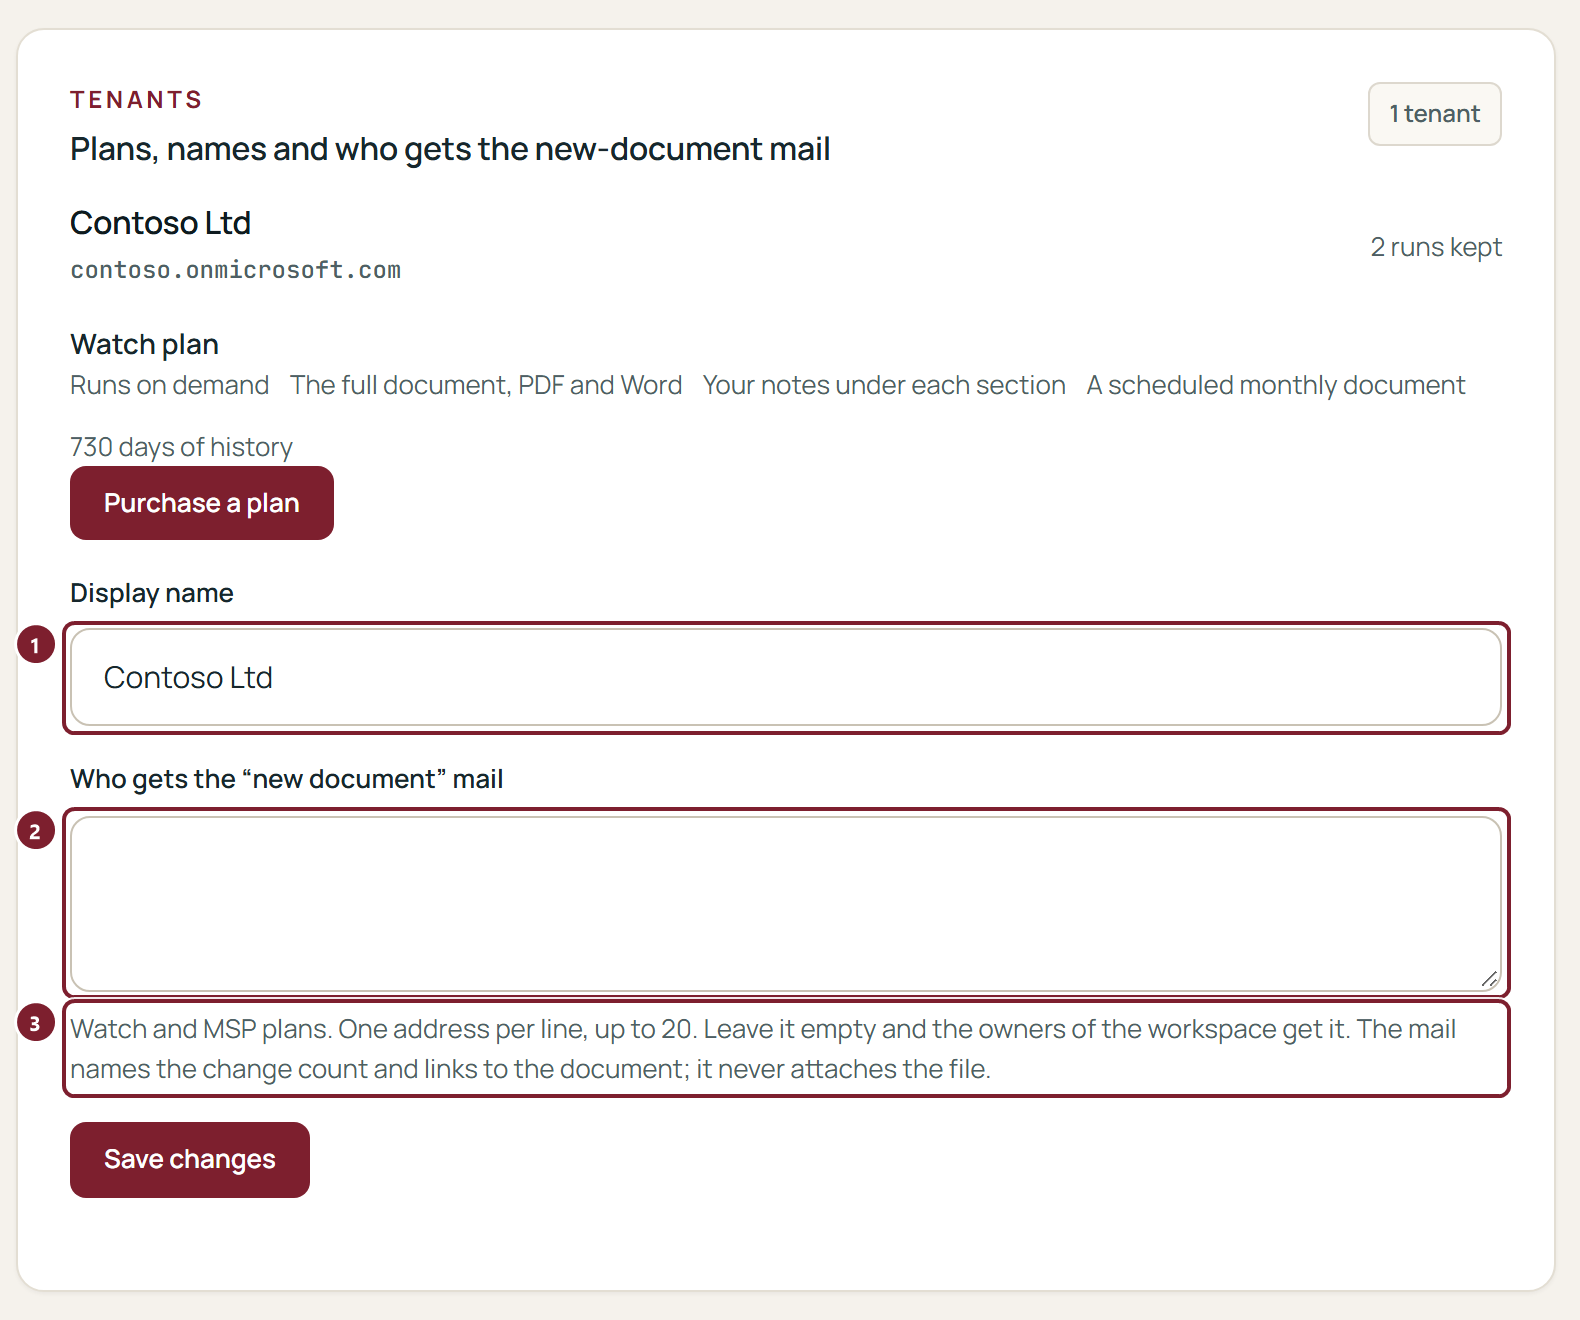
- 1Display name: how the tenant is called in the portal, the documents and the mail.
- 2Who gets the "new document" mail: one address per line, up to 20. Leave it empty and the owners of the workspace get it.
- 3What the mail says: the change count and a link to the document. It never attaches the file. Watch and MSP plans.
The members
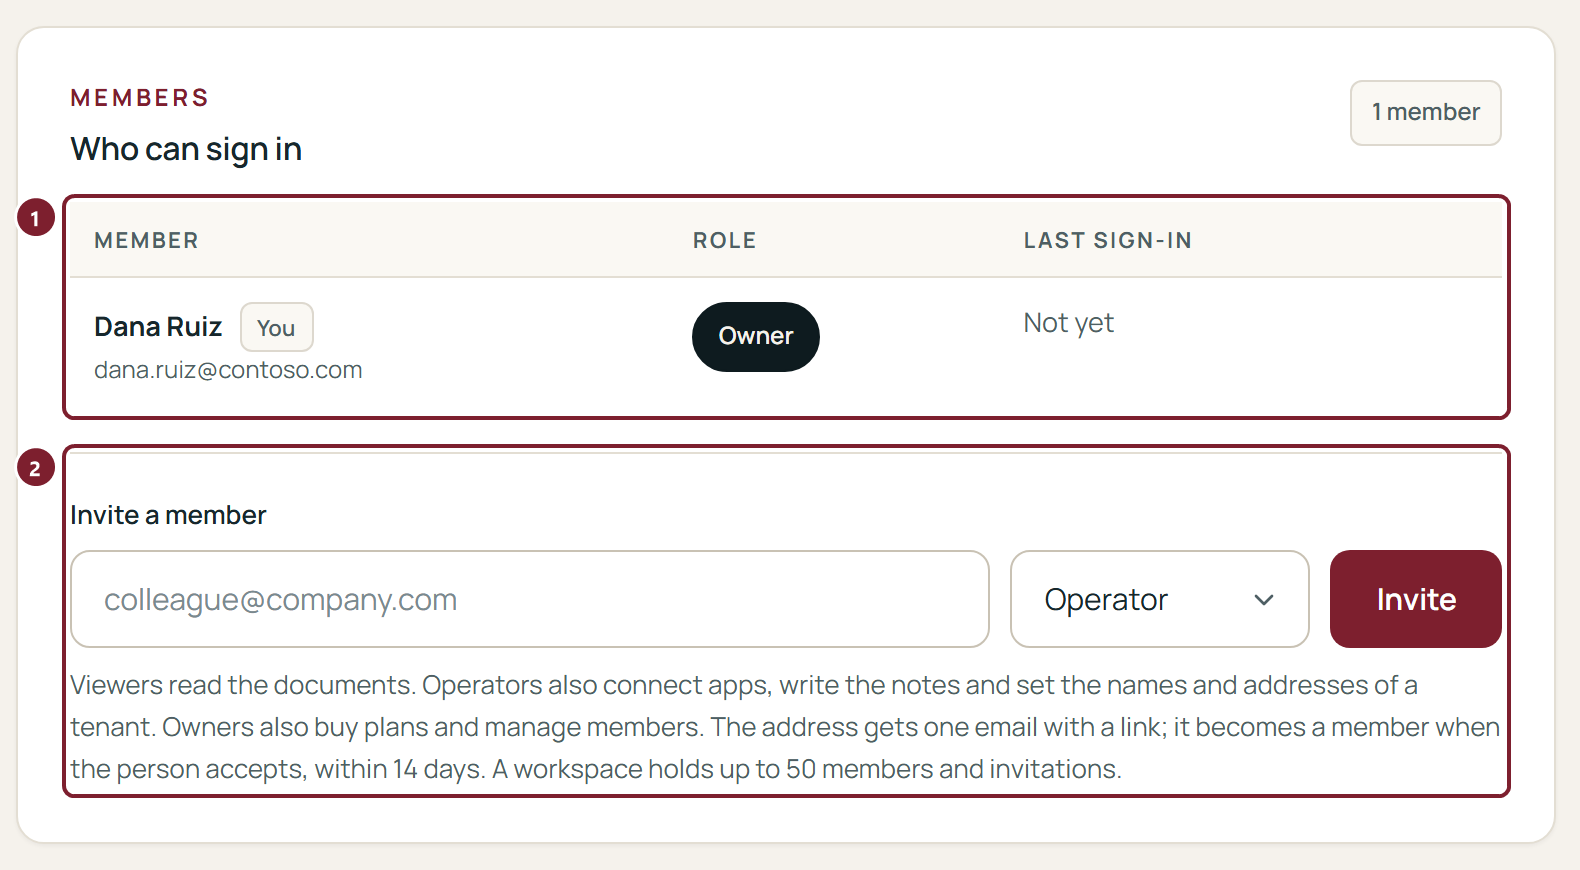
- 1The people who can sign in, their roles and their last sign-in.
- 2Invite a member: an address and a role. Viewers read the documents. Operators also connect apps, write the notes and set the names and addresses of a tenant. Owners also buy plans and manage members. The address gets one email with a link; it becomes a member when the person accepts, within 14 days. A workspace holds up to 50 members and invitations.
Anything else: support@glacierpointtech.com, or Support in the portal's menu. How it works describes every step, and Security lists every permission by name.